Blown In Insulation: Difference between revisions
From Mike Beane's Blog
No edit summary |
mNo edit summary |
||
| Line 14: | Line 14: | ||
It was crazy, but now the house is holding its own in the cold. It heats up faster and stays warm longer. | It was crazy, but now the house is holding its own in the cold. It heats up faster and stays warm longer. | ||
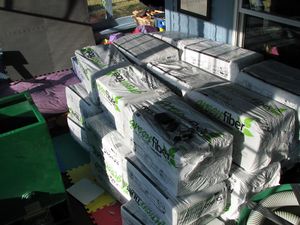
[[Image:Insulating1.jpg|thumb|20+ bags of insulation]] | [[Image:Insulating1.jpg|thumb|20+ bags of insulation|right]] | ||
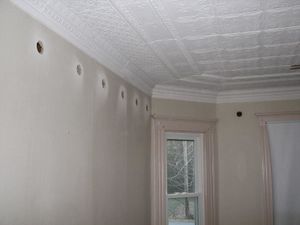
[[Image:Insulating2.jpg|thumb|Holes in the living room]] | [[Image:Insulating2.jpg|thumb|Holes in the living room|right]] | ||
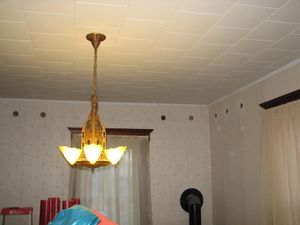
[[Image:Insulating3.jpg|thumb|Holes in the dining room]] | [[Image:Insulating3.jpg|thumb|Holes in the dining room|right]] | ||
=Outcome and cost= | =Outcome and cost= | ||
| Line 31: | Line 31: | ||
===Holesaws & Plaster=== | ===Holesaws & Plaster=== | ||
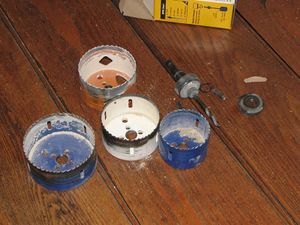
[[Image:Insulating4.jpg|thumb|Holesaw graveyard]] | [[Image:Insulating4.jpg|thumb|Holesaw graveyard|left]] | ||
[[Image:Insulating5.jpg|thumb|3" outer 2 3/4" inner]] | [[Image:Insulating5.jpg|thumb|3" outer 2 3/4" inner|left]] | ||
Plaster will dull your hole-saw in about 7 holes. I had the chance to try out 3 manufacturers of bi-metal bits and they all had about the same life span. On day 1 I started noticing that on holes 8 and up, when I got to the lathe I was starting to friction burn the wood. It's old dry wood. '''''You *DO NOT* want to friction burn wood like this'''''. It will smoke. It may get worse. So I ate through my hole-saw collection and went out to buy a couple more 3" hole-saws, but they were sold out in my area. So I bought one size down (2 3/4") for the downstairs and thought of a plan. | Plaster will dull your hole-saw in about 7 holes. I had the chance to try out 3 manufacturers of bi-metal bits and they all had about the same life span. On day 1 I started noticing that on holes 8 and up, when I got to the lathe I was starting to friction burn the wood. It's old dry wood. '''''You *DO NOT* want to friction burn wood like this'''''. It will smoke. It may get worse. So I ate through my hole-saw collection and went out to buy a couple more 3" hole-saws, but they were sold out in my area. So I bought one size down (2 3/4") for the downstairs and thought of a plan. | ||
Latest revision as of 15:04, 6 January 2008
Why we finally did it
So glad we did blown in insulation back in November. Most of you know we have an older house (1920's) and one of the fun things we discovered was there was NO insulation in any of the walls. Also, some of you know we put in a pellet stove last year along with a propane heater in the kitchen. This year we were going to get oil delivered so we had some in the tank, however the company gave us a laundry list of things that needed to be done to bring our tank into spec or else they wouldn't deliver.
Oh, and the quote was insane.
Instead of furthering the dependency on oil (I already had our 6 tons of corn and wood pellets in the basement), I figured the money would be better spent insulating the walls. We had replaced all of the windows last year, so this was the final thing we really needed to do.
Getting Ready
Measured things, guesstimated in sq ft (learned about R-Values) and cu ft, then made a run down to Home Depot, only to find they were out of cellulose insulation. I should have called first even though we were there a few days prior. So then I turned the van north, passed Newport and drove up to Bangor's Home Depot. Got the blower and 25 bags (I had estimated 20 bags needed).
Doing it
We spent the weekend after Thanksgiving drilling 3" holes in our walls in the Kitchen (newly re-painted by Fiona), dining room, living room, Erin's room, our room. Luckily Callum's room had already been insulated when I tore apart that room. We used 18 bags. So I kept the remaining two (meets the min for a free blower use) and returned the 5 with the blower. Got a good comment from the guy that helped bring that back in "most people really don't estimate that well", so that made me feel good.
It was crazy, but now the house is holding its own in the cold. It heats up faster and stays warm longer.
Outcome and cost
I can't say that we're living in toasty comfort 24/7 as the nights are brutal, but it is such a difference since we did this. I believe the whole project was just under $400 and that included buying hole-saws and a stud finder. It was worth it.
Things we learned
What to expect and setting up
Be forewarned - it's messy and make sure the person helping you is attentive and can notice the difference in the air flow through the tube quickly. Fiona had it down to where she would stop the flow about 5 seconds after she could tell the hose was starting to flux from the cavity filling up. Each time we had a well packed area of the wall and it was like clockwork. Walkie-Talkies are a great help and all you really need is the little music button to respond back with if you are the one holding the hose to the wall if all is 'ok' to turn on.
Drilling Holes
I wanted to expand a little on the hole saw picture and the last hole picture. We did this across two days and on day 1 we drilled about 30 holes (3 rooms) and on day 2 we drilled 21 holes (2 rooms). I avoided spaces that I knew had electrical wiring and I'll deal with those at a later date. It was a safety/comfort thing and in the event of drilling into a wire (even off), I didn't want to have to repair electrical wiring.
Day 1 took over 5 hours. Day 2 took just over 1 hour 4 minutes. This included moving things, covering things, drilling holes, pumping the insulation in. Oddly enough most of the time went into drilling the holes and the time saved was with what I finally figured out while doing this.
Holesaws & Plaster
Plaster will dull your hole-saw in about 7 holes. I had the chance to try out 3 manufacturers of bi-metal bits and they all had about the same life span. On day 1 I started noticing that on holes 8 and up, when I got to the lathe I was starting to friction burn the wood. It's old dry wood. You *DO NOT* want to friction burn wood like this. It will smoke. It may get worse. So I ate through my hole-saw collection and went out to buy a couple more 3" hole-saws, but they were sold out in my area. So I bought one size down (2 3/4") for the downstairs and thought of a plan.
On day 2, I went back to the 3" that I had discarded because it was scarring the wood and basically dedicated it to plaster only. I did all my plaster holes for the dining room (10 holes) first and then I switched out to the 2 3/4" hole-saw and attacked the lathe. It was like going through butter for all 10 holes. Fast and done. I continued into the living room and did the next 11 holes in the same manner. Same outcome.
What I learned: Dedicate one hole-saw to being the plaster cutter since it doesn't need to be overly sharp and the motion will do the cutting fine. Dedicate another for the wood. Simple and fast. Most of our time saved on Day 2 came from this revelation. Seems common sense once you figure it out, but if you've never done this before, you'll probably have done the same thing at first.
Hole Sizes
The blower hose is a 3" hose, however it fit fine in the 2 3/4" hole as someone had cut a small 1"x3" section out of the tip and it folded into a small cone shape easily. What I did notice after the fact was that with a 3" plaster hole and a 2 3/4" lathe hole was that now during the mudding/repair process there is now a 1/4" lip to work with and hold the mud. Otherwise you are just putting mud into a 3" hole (use backing in the traditional "patching drywall" method) and I don't think it anchors as well as with the lip.
Timing
Oh, and one final thing. When you're on the 2nd floor and you think it's gone too long.. like way too long.. stop. Go to the attic and marvel at the new pile of insulation you'll have in the corner.
